Introduction
This project could sound weird because why would I want to use a freezer instead of a fridge? why would I want to make a Lipton IceTea dispenser and what does it mean?
There are a lot of questions about this project and there are only two answers:
How refill the fridge


I had to make sure that all holes were isolated and for that I have used the awesome product Sugru that was a kind of silicon and it makes a perfect insulating.
This project could sound weird because why would I want to use a freezer instead of a fridge? why would I want to make a Lipton IceTea dispenser and what does it mean?
There are a lot of questions about this project and there are only two answers:
- My friend bought the wrong fridge to store some drinks but he only realised this when we got home. It wasn't a fridge but a freezer!
- We couldn't be bothered to get up, open a bottle and refill our glass, instead we prefered pressing a button and having our glasses automatically refilled.
If you want to reproduce this project you can avoid to buying a freezer instead buy a fridge and remove some other components.
Transforming a freezer to a fridge
I thought that the best option to don't waste more money and keep the bottle in a liquid state, is to control the temperature inside of the freezer. I got one temperature sensor DHT22 and attached a relay to the power socket, by doing this I could switch the power on and off when the temperature was too high or too low and the bottle didn't become a big block of ice.
 |
| Back of the freezer where was connected the sensor to turn on/off by the sensor of temperature |
I connected the sensor and the relay to the Arduino, I made a little script that keeps it switched on because if the temperature drops below 5° to 0°C it stops working and becomes a freezer.
  |
| The two wires ( Brown and White ) are going to connect into the relay |
IceTea distribution
This is the most expensive part of the process, I had to make one hole on the fridge to ensure the pump works effectively. The tube is used to get the liquid from the freezer.
To ensure that the warmth was not dispersed through these holes, I had to use some kind of isolant and I chosen the product Sugru.

In the end I had to contact the company TOPSFLO that had certificated pumps and I bought one for 30 pounds ( included the shipping cost ).
This was the pump ( website ):


- Holes
The freezer was not equipped with a hole to pass one hose, that means that I had to use a drill to make it.
 |
| There is one hole, on the lower part |
- Water pump
The pump was the main part of the project as it has to move the liquid from the fridge into the glass, but I had to make sure that the pump was FDA tested!
If you don't have a certificated pump , you could drink a poisoned liquid.
I hadn't check this part of the project when I bought the pump( see the picture below ). Fortunately I found that it's very dangerous to buy the cheapest one because you didn't want to spend 10-20 pounds more.
If you don't have a certificated pump , you could drink a poisoned liquid.
I hadn't check this part of the project when I bought the pump( see the picture below ). Fortunately I found that it's very dangerous to buy the cheapest one because you didn't want to spend 10-20 pounds more.

In the end I had to contact the company TOPSFLO that had certificated pumps and I bought one for 30 pounds ( included the shipping cost ).
This was the pump ( website ):

To connect this pump with your Ardiuno, please have a look at this tutorial: http://bildr.org/2012/03/rfp30n06le-arduino/.
- Hose
I bought two types of hoses, one of them is used to connect the bowl to the pump ( 13mm ) and the second one is connect the pump to outside of the fridge ( 9mm ).

I also bought a tap hat gourmet to fit the hose into the bowl, in that way I can take off the tube and wash the container without cutting anything.
- Push buttons
I have chosen to install two push buttons, the first one fills the glass in one shot and the other one is working as a normal button, when you press it the pump is working and when you release everything stops.

- Valves
The system could work without any valves because there wasn't any problem of functionality, the only problem was that you wouldn't drink something that was not isolate and kept into a bottle.
If I didn't use a valve, the liquid will be the same as leaving the bottle open in a fridge.
I found the non return valve for the external tube.
Prototypes
Demo 1
Demo 2
How refill the fridge

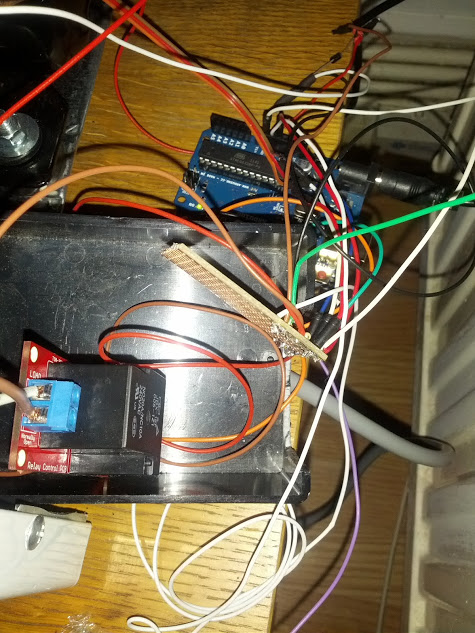
Arduino messy wiring
The wiring was a little bit messy on the back of the fridge but I want to explain what I have connected there:
I have made a own PCB that I have attached:
- MOSFET: switch the pump on/off
- Resistents: DTH22 needs one and the pump
- 5V and Ground: these two just to have a specific place to get the power and ground
I have connected the relay to the Arduino to turn on/off the fridge and 2 wires to get an analog input of the two buttons.
I had to make sure that all holes were isolated and for that I have used the awesome product Sugru that was a kind of silicon and it makes a perfect insulating.
No comments:
Post a Comment