Thursday 28 June 2012

URM37 Proximity sensor

This article talks about the awesome URM37 V3.2 proximity sensor by DFRobot, I want to show you what are the steps to make it working because when I was looking for this I couldn't find a good tutorial and I became frustrated when the sensor didn't work.


Jumpers
This sensor has 3 jumpers on the back, you need to change the position of them as the picture below shows:
This configuration is to enable the TTL connection. If you don't change it before to connect your Arduino, you will damage the sensor. 


Wiring
The wiring of this sensor is very easy, you need to connect 4 cables in this sequence:

  • Sensor TX     =>    Arduino pin 6
  • Sensor RX     =>    Arduino pin 7
  • Sensor 5v       =>   Arduino vcc
  • Sensor GND  =>   Arduino GND

and you should see something like this:


Code
You have to download a library that is made for this sensor, Library from Lauren(Only Arduino IDE 1.0), this library should work without any problem but you need to comment 2 lines before to using it.
Open the URMSerial.cpp and URMSeral.h and then comment the line #include <HardwareSerial.h> otherwise your Arduino will give you some errors of compiling.

Ok, we are ready to test the first example that DFRobot made for us, just open this link and push it on your Arduino and then you will see something like this:


If you are getting the result ERROR everytime and you don't see any number, try the following:
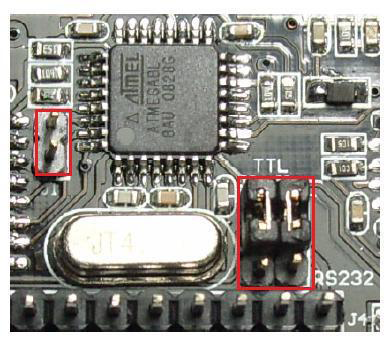
  1. Check your wiring, maybe you didn't connect your sensor very well
  2. Your sensor is broken and you should contact DFRobot to replace this item

Saturday 9 June 2012

Processing and Arduino

INTRODUCTION
I was thinking about this opportunity to communicate between Processing and Arduino and I made a simple example that I get a visual feedback from a light sensor.
The idea is to create a scenery and change it depending on the value of the sensor. Basically show the sun with a brightness color when there is a lot of light and then show the moon with a dark background  when there isn't enough light.

PROCESSING
What you need is the Processing IDE and try to play with it, create a scenery and some animation.
What I did is a simple animation of moving a circle up and down, and then change the background color.
As soon as you have something working, you need to implement Firmata for Processing  (http://www.arduino.cc/playground/Interfacing/Processing).

***I found an issue with Linux, if you want to communicate with your Arduino, you need to make sure that  with your Arduino IDE works and then lunch this command:

sudo ln -s /dev/ttyACM3 /dev/ttyS42
ACM3 = Arduino port
ttyS42 = This port will be use on processing

You need to change your connection line to something like that:
 arduino = new Arduino(this, "/dev/ttyS42", 57600);

Otherwise if you are Windows user you need to write something like that:
  arduino = new Arduino(this, Arduino.list()[0], 57600);
[0] = Try to change the number zero with something else if you are getting some connection errors.

I want to tell you the truth, you are going to think that Processing is another complicate language and you will never use it, NO that is absolute wrong, I made this project in about 2 hours, Processing is very simple and you can find a lot of examples and libraries.


ARDUINO
You need to upload on your Arduino the Standard Firmata that is on your example menu.
Ok, the last step is to connect your device on your Arduino, I bought a light sensor that works with an analog pin and I attached it on the pin A0.

Change your Processing example to get the value , in my case the command to get the analog input was:
arduino.analogRead(0);

EXAMPLE
This is my example that I made with Processing and Arduino, you can check the video on the bottom, please don't care about my design skills :).


import processing.serial.*;
import de.looksgood.ani.*;
import cc.arduino.*;
import guicomponents.*;

//sudo ln -s /dev/ttyACM3 /dev/ttyS42
//Pin A0
Arduino arduino;

color off = color(4, 79, 111);
color on = color(84, 145, 158);

float sunX = 800, sunY = 100;
float moonX = 800, moonY = 800;
int light = 50;
float lightMoon = 0, lightSun= 0, lightSky = 191, lightSky2 = 255;
GWSlider sdr1;

int a = 0;

void setup() {
  size(1024, 800);
  arduino = new Arduino(this, "/dev/ttyS42", 57600);
  Ani.init(this);
  sdr1 = new GWSlider(this,20,20,260);
  sdr1.setLimits(0, 0, 1000);
}

void draw() {
  background(0, lightSky, lightSky2);
  stroke(on);
  displaySheme(light);
  showVillage();
  light = arduino.analogRead(0);

  fill(0, 102, 153);
  text("Current light: "+light,50,780);
}

void showVillage() {
  //Draw the grass
  fill(50, 205, 50);
  rect(0, 600, 1024, 200);
  //Draw the house
  stroke(off);
  fill(139, 69, 19);
  rect(100, 450, 160, 200);

  fill(211, 211, 211);
  rect(120, 480, 50, 50);
  rect(190, 480, 50, 50);

  rect(160, 580, 50, 70);

  fill(193, 205, 193);
  triangle(100, 450, 180, 400, 260, 450);
}

void showSun() {
  fill(255, 255, lightSun);
  ellipse(sunX, sunY, 100, 100);
}

void showMoon() {
  fill(255, 255, 255);
  ellipse(moonX, moonY, 100, 100);
}

void displaySheme(int light) {
  float newY = constrain(map(light, a, 100, 1100, 100), 100, 1100);
  float newC = constrain(map(light, a, 100, 255, 0), 0, 255);
  float newB = constrain(map(light, a, 161, 0, 255), 0, 255 );

  if (newY > 600) {
    Ani.to(this, 1.5, "sunY", newY);
    Ani.to(this, 1.5, "lightSun", newC);
    sunY = 700;  
    Ani.to(this, 1.5, "moonY", 100);
  }
  else {
    Ani.to(this, 1.5, "sunY", newY);
    Ani.to(this, 1.5, "lightSun", newC);
    Ani.to(this, 1.5, "moonY", 700);
  }
  //change the sky
  Ani.to(this, 1.5, "lightSky", newB);
  Ani.to(this, 1.5, "lightSky2", newB);
  showSun();
  showMoon();
}

void handleSliderEvents(GSlider slider) {
  a = slider.getValue();
  println("integer value:" + slider.getValue() + " float value:" + slider.getValuef());
}


VIDEO