Monday 30 May 2011

Arduino Uno

Overview

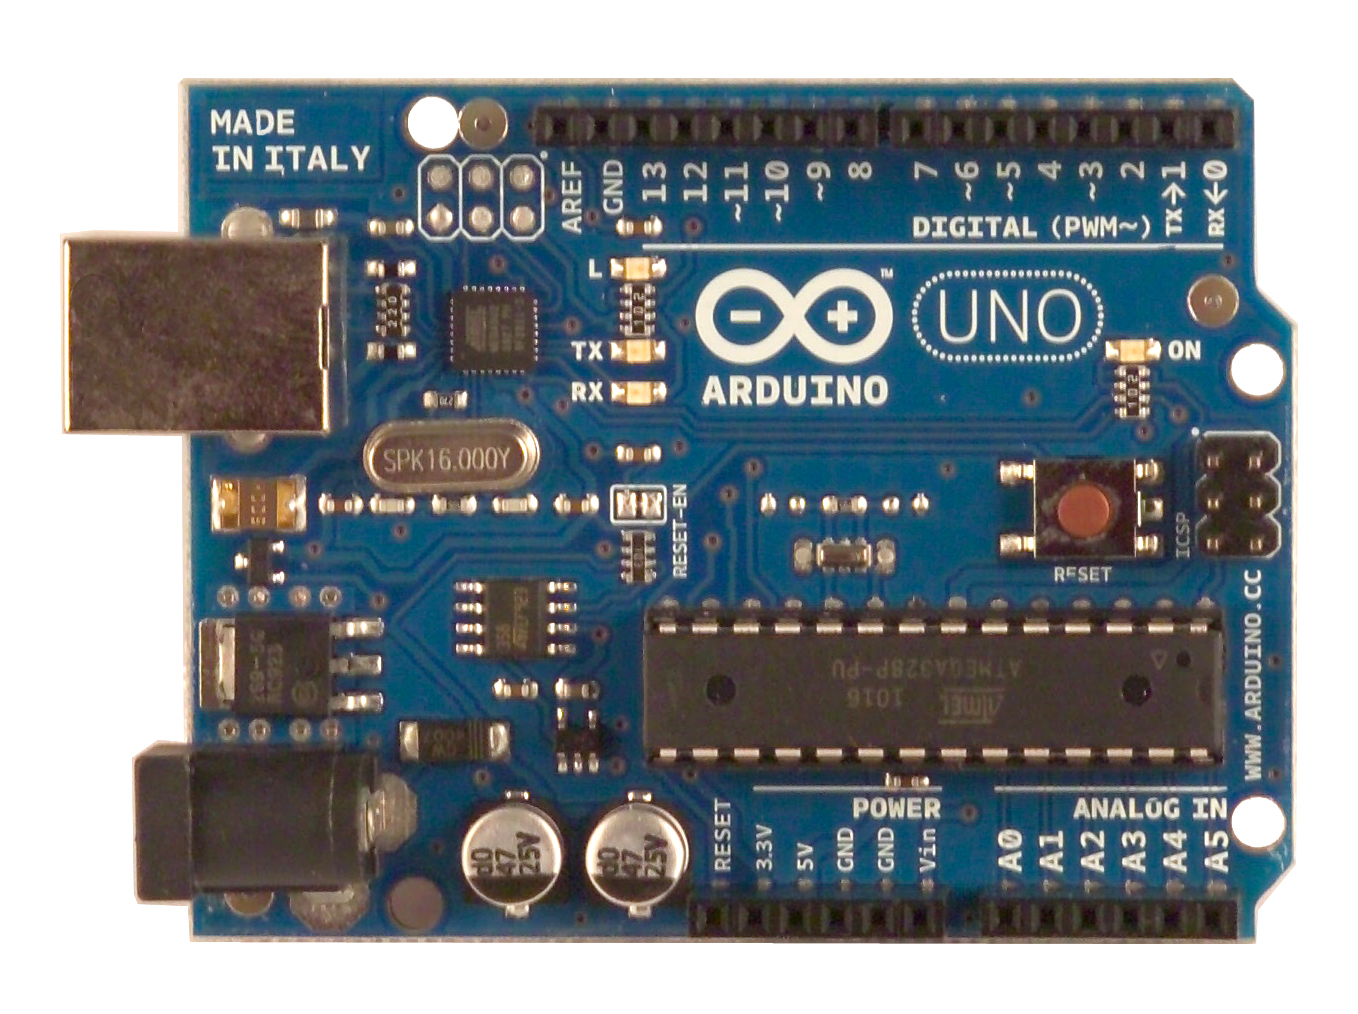
The Arduino Uno is a microcontroller board based on the ATmega328 (datasheet). It has 14 digital input/output pins (of which 6 can be used as PWM outputs), 6 analog inputs, a 16 MHz crystal oscillator, a USB connection, a power jack, an ICSP header, and a reset button. It contains everything needed to support the microcontroller; simply connect it to a computer with a USB cable or power it with a AC-to-DC adapter or battery to get started.
The Uno differs from all preceding boards in that it does not use the FTDI USB-to-serial driver chip. Instead, it features the Atmega8U2 programmed as a USB-to-serial converter.
"Uno" means one in Italian and is named to mark the upcoming release of Arduino 1.0. The Uno and version 1.0 will be the reference versions of Arduino, moving forward. The Uno is the latest in a series of USB Arduino boards, and the reference model for the Arduino platform; for a comparison with previous versions, see the index of Arduino boards.

Summary

MicrocontrollerATmega328
Operating Voltage5V
Input Voltage (recommended)7-12V
Input Voltage (limits)6-20V
Digital I/O Pins14 (of which 6 provide PWM output)
Analog Input Pins6
DC Current per I/O Pin40 mA
DC Current for 3.3V Pin50 mA
Flash Memory32 KB (ATmega328) of which 0.5 KB used by bootloader
SRAM2 KB (ATmega328)
EEPROM1 KB (ATmega328)
Clock Speed16 MHz

Problems and solutions

Ho constatato che il Fez domino non è adatto per questo genere di progetto, allora ho iniziato a comprare il mio nuovo controller, Arduino UNO.
Con l'Arduino ho un supporto migliore ed è più facile sviluppare a livello hardware, il Fez domino non è ancora pronto per questo genere di cose.

Come si puo trovare su internet, si puo prendere spunto su da questo progetto http://jayeshprojects.blogspot.com/2010/04/real-time-mobile-gps-tracker-with.html o vi sono librerie per aiutarti nello sviluppo.

Ora mi dedico alla riscrittura del codice per l'arduino.

Cellular Shield with SM5100B


Description: The Cellular Shield for Arduino includes all the parts needed to interface your Arduino with an SM5100B cellular module. This allows you to easily add SMS, GSM/GPRS, and TCP/IP functionalities to your Arduino-based project. All you need to add cellular functionality to your Arduino project is a SIM card (pre-paid or straight from your phone) and an antenna and you can start sending Serial.print statements to make calls, send texts and serve web pages!
 The main components of the Cellular Shield are a 60-pin SM5100B connector, a SIM card socket, and an SPX29302 voltage regulator configured to regulate the Arduino's raw voltage to 3.8V. The board's red LED indicates power. The Arduino's reset button is also brought out on the shield.

Two solder jumpers on the board allow you to select which serial pins interface with the cellular module - software (D2, D3) or hardware (D0, D1). There is also a 5-pin, 0.1" spaced header with connections for microphone inputs and speaker outputs. Headers are not soldered on, we recommend the 6 and 8-pin stackable headers.

The SM5100B cellular module is included with this product, however an antenna is not. It is pre-configured to 9600bps.

Friday 13 May 2011

Relay Module 5V RLY101-FR4


1 PCS One channel relay module board, for PIC / AVR / 8051 etc project.
Led indicator for each relay channel.
Use BC547  driving relay, Improve the reliability of action.
Power Supply: 5V / 400mA.
Input voltage: 0V - 0.5V (relay is OFF),
                         0.5V - 4V (unknown state),
                         4V - 5V (relay is ON).
PCB thickness: 1.6mm.

Relay Spec:
Coil: Voltage: 5V DC.    Current: 71.4mA.
Contact Capacity: 250 VAC/7 Amp or 30 VDC/10 Amp.

Sunday 8 May 2011

SIMCOM SIM300 GPRS+GSM Module Mini Board AVR Arduino


General features


  • Tri-Band GSM/GPRS 900/1800/1900MHz or Quad-Band GSM.GPRS 850/900/1800/1900MHz

  • GPRS multi-slot class 10/8

  • GPRS mobile station class B

  • Compliant to GSM phase 2/2+
           Class 4 (2W @ 900MHz)
           Class 1 (1W @1800/1900MHz)

  • Dimensions: 50mmx33mmx6.2mm

  • Weight: 13.8g

  • Control via AT commands (GSM 07.07, 07.05 and SIMCom enhanced AT Commands)

  • SIM application toolkit

  • Supply voltage range 3.4V - 4.5V

  • Low power consumption

  • Normal operation temperature:
          -30°C to +70°C

  • Restricted operation temperature:
          -35°C to +80°C

  • Storage temperature:
          -40°C to +85°C


  • More information: http://projectsmax246.blogspot.com/2011/04/socket-and-gprs.html

    FEZ Domino

    Description: Say hello to the FEZ  domino. This is a tiny open source board running Microsoft .NET Micro Framework. This allows you to more efficiently write code using Microsoft’s free Visual C# express and the C# programming language. Build your next projects in minutes by connecting FEZ Domino to one of the shields or the many available components. Many libraries are already included like FAT file system, threading, UART, SPI, I2C, GPIO, PWM, ADC, DAC and many more.
    Check out this comparison chart between the FEZ Domino and the FEZ Panda.

    Features:
    • Based on Microsoft's .NET Micro Framework
    • Runs on 72Mhz NXP ARM processors
    • Pin compatible with Arduino
    • Shield Compatable
    • It's freakin' easy to use!
    Documents:

    LinkSprite JPEG Color Camera TTL Interface

    Description: The LinkSprite JPEG color camera allows you to capture and output JPEG images through UART, making it easy to integrate into an existing design.
    Note: Cameras purchased before November 01, 2010 output RS232 serial data, so you will need a level converter if you plan on connecting it to an Arduino or other microcontroller. See the related items for an appropriate converter. Cameras purchased after this time are use a TTL interface.
    Note: These only work reliably with a 5V power supply, even though the manual states they can work at 3.3V.
    Features:
    • VGA/QVGA/160x120 resolution
    • Support capture JPEG from serial port
    • Default baud rate of serial port is 38400
    • 5V power supply
    • Size 32X32mm
    • Current consumption: 80-100mA
    Documents:
     Sample

     using (var camera = new LinkspriteCamera(new SerialPort("COM1", 38400, Parity.None, 8, StopBits.One)))
                {
                    //DoSuccessFail(camera.Reset, "Reset successfull", "ERROR resetting");
                    //DoSuccessFail(() => camera.SetPictureSize(LinkspriteCamera.SET_SIZE_640x480), "Size change successfull", "ERROR changing size");
                    //DoSuccessFail(camera.Reset, "Reset successfull", "ERROR resetting");
                    if(camera.Reset())
                        camera.GetPicture(ProcessChunk);
                    DoSuccessFail(camera.Stop, "Stop successfull", "ERROR stopping");
                }


    FEZ Library: http://code.tinyclr.com/project/220/linksprite-camera-library/


    Sample pic


    Bad point


    The camera doesn't have a white balance and the pictures are half color and half BW ( outdoor )

    Digital Infrared motion sensor

    Introduction
    This is a simple to use motion sensor. Power it up and wait 1-2 seconds for the sensor to get a snapshot of the still room. If anything moves after that period, the 'alarm' pin will go low.
    Specification
    • Type: Digital
    • Supply Voltage:3~5V
    • Current:50μA
    • Working temperature:0℃~+70℃
    • Output level(HIGH):4V
    • Output level(LOW):0.4V
    • Detect angle:110 Degree
    • Detect distance:7 meters
    • Size:28mm×36mm
    • Weight:25g

    Sample


    InterruptPort  PIR = new InterruptPort((Cpu.Pin)FEZ_Pin.Interrupt.Di13, false, Port.REsistorMode.PullDown, Port.InterruptMode.InterruptEdgeHigh);
    PIR.OnInterrupt += new NativeEventHandler(doSomething);


    static void doSomething(uint port, uint state, DateTime time) {
        //do something, turn on led, write file, ecc
    }

    Saturday 7 May 2011

    Humidity and Temperature Sensor - DHT22


    Description: The DHT-22 is a low cost humidity and temperature sensor with a single wire digital interface. The sensor is calibrated and doesn't require extra components so you can get right to measuring relative humidity and temperature.
    Features:
    • 3.3-6V Input
    • 1-1.5mA measuring current
    • 40-50 uA standby current
    • Humidity from 0-100% RH
    • -40 - 80 degrees C temperature range
    • +-2% RH accuracy
    • +-0.5 degrees C
    Documents:

    Sample

    DHT11 MyDHT11 = new DHT11((Cpu.Pin)FEZ_Pin.Digital.Di6, (Cpu.Pin)FEZ_Pin.Digital.Di7);
     
    while (true)
    {
        if (MyDHT11.ReadSensor())
        {
            Debug.Print("Temperature = " + MyDHT11.Temperature.ToString() + "°C");
            Debug.Print("Humidity    = " + MyDHT11.Humidity.ToString() + "%");                   
        }
        else Debug.Print("DHT11 Error : " + MyDHT11.LastError);
     
        Thread.Sleep(10000);
    }
     
    FEZ Library 


    Friday 6 May 2011

    Camera works with the sensor

    Finalmente ho ricevuto il pacco con gli ultimi pezzi per completare la mia opera, il contenuto era della Camera e sensore di temperatura.

    Nell'ordinazione ho inserito un supporto per saldare sulle piastre o tenere fermi due pezzi di filo. Questo apparecchio mi è servito per una buona saldatura dei fili della Camera visto che non avevo una presa a 5 pin.
    Invece è stato un pò piu rude il collegamento sulla piastra dove mi sono affidato al mio amico Scotch! Non preoccupatevi, nei prossimi giorni provvederò nella saldatura.
    Il risultato finale non era quello desiderato, però ormai per il prezzo e le specifiche dell'HW me lo potevo aspettare.
    Finaly I received the pack with the last items to complete the my project, in the box were the camera and the temperature sensor.

    I bought a support that it cans help me to weld the cable on the plate.
    I settled 4 cables on the camera's board because I hadn't a plug for 5 cables.

    Instead the connection on the FEZ was a little rude with the magic scotch! I know that is the worst solution but don't worries I will change that as soon as possible.


    The final result wasn't that I wished but already due the price and the specification about the HW I could imagine this.

    Tuesday 3 May 2011

    MicroSD and Configuration

    Nell'attesa che mi arrivano i nuovi pezzi dalla China, ho iniziato a sviluppare il supporto di storage dove si troveranno tutti i dati,foto e altro.

    La programmazione non era stata un problema a parte un piccolo intoppo sulla restituzione del Unix timestamp e la regolazione dell'ora.

    Nella prossima settimana spero di continuare e testare le nuove funzionalità, il sensore di movimento, termometro e finire la torretta.


    While waiting I got the new items from China and then I began to developer the storage system where they will stay all data, pics and other.

    The coding wasn't a problem apart a little trouble about the Unix timestamp and the time setting.

    The next week I hope to conitnue and test the new features: the motion sensor, therm and the motor system.

    Monday 2 May 2011

    PIR and IO Expansion

    Oggi con mia grande gioia ho ricevuto alcuni pezzi da DFRobot.com, così ho potuto testare e completare un'altro pezzo del mio progetto.


    Ho testato il sensore di movimento e la scheda di espansione con alimentare esterna per le periferiche esterne.


    Inoltre ho scoperto che il Real time clock si resetta ad ogni avvio, questo perchè non vi è un condensatore o batteria collegato alla scheda.
    Perciò dovro aggiungere alla mia lista una batteria da 3V per tenere il RTC attivo.