This article talks about the awesome URM37 V3.2 proximity sensor by DFRobot, I want to show you what are the steps to make it working because when I was looking for this I couldn't find a good tutorial and I became frustrated when the sensor didn't work.
Jumpers
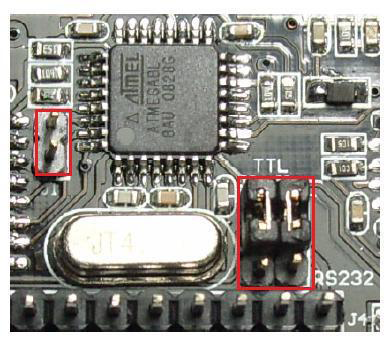
This sensor has 3 jumpers on the back, you need to change the position of them as the picture below shows:
Wiring
The wiring of this sensor is very easy, you need to connect 4 cables in this sequence:
and you should see something like this:
Code
You have to download a library that is made for this sensor, Library from Lauren(Only Arduino IDE 1.0), this library should work without any problem but you need to comment 2 lines before to using it.
Open the URMSerial.cpp and URMSeral.h and then comment the line #include <HardwareSerial.h> otherwise your Arduino will give you some errors of compiling.
Ok, we are ready to test the first example that DFRobot made for us, just open this link and push it on your Arduino and then you will see something like this:
If you are getting the result ERROR everytime and you don't see any number, try the following:
Jumpers
This sensor has 3 jumpers on the back, you need to change the position of them as the picture below shows:
This configuration is to enable the TTL connection. If you don't change it before to connect your Arduino, you will damage the sensor.
Wiring
The wiring of this sensor is very easy, you need to connect 4 cables in this sequence:
- Sensor TX => Arduino pin 6
- Sensor RX => Arduino pin 7
- Sensor 5v => Arduino vcc
- Sensor GND => Arduino GND
and you should see something like this:
Code
You have to download a library that is made for this sensor, Library from Lauren(Only Arduino IDE 1.0), this library should work without any problem but you need to comment 2 lines before to using it.
Open the URMSerial.cpp and URMSeral.h and then comment the line #include <HardwareSerial.h> otherwise your Arduino will give you some errors of compiling.
Ok, we are ready to test the first example that DFRobot made for us, just open this link and push it on your Arduino and then you will see something like this:
- Check your wiring, maybe you didn't connect your sensor very well
- Your sensor is broken and you should contact DFRobot to replace this item


No comments:
Post a Comment